Testing Embedded Hardware
Traditional Quality Assurance usually applies to just software as an engineer spends their time testing mobile, web, or desktop applications – or sometimes a backend API (Application Programming Interface). While traditional test case development, management, and organization still apply to testing hardware, there can be a large difference in the actual testing activities performed.

Manually Testing Hardware
Instead of simply using a mouse and keyboard, and maybe a web browser, hardware usually needs to be manually manipulated. That means you’ve got to press physical buttons, look at LCDs, use a controller, or otherwise stimulate input.
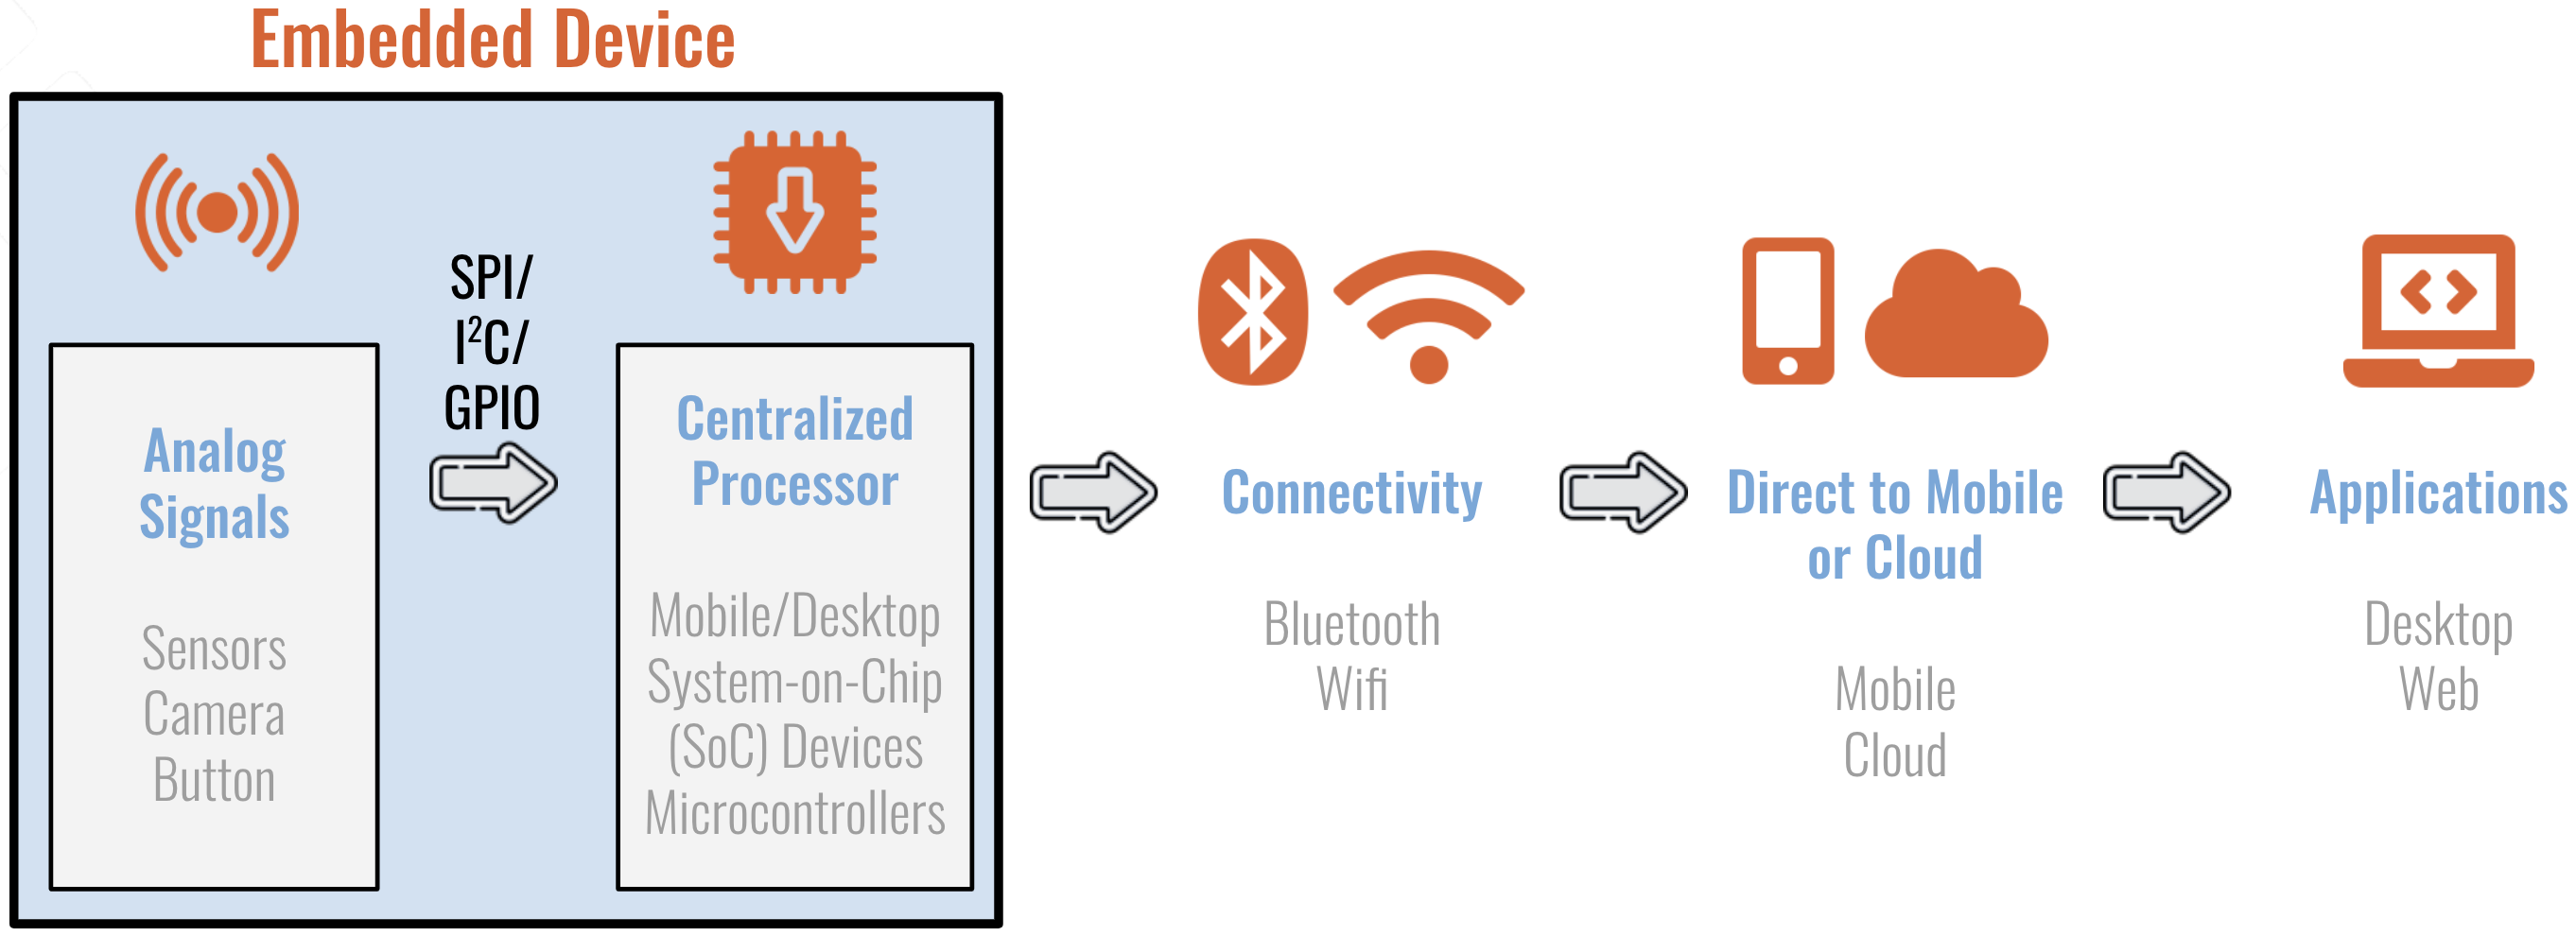
Let’s start by defining and understanding the make-up of common embedded systems that you may find yourself testing.
Sensors, Sensors, Oh my.
Often, the reason for having hardware is because the application requires us to detect things in our environment. Hardware takes real-world analog signals, turns them into digital information so they can be processed, analyzed, reported, and is designed to take action based on what occurs.
Wikipedia lists hundreds of different sensors, but here are some of the more popular ones:
Sample Sensor Types
- Temperature: A physical quantity of how hot or cold something is. Example uses might be refrigerators, body temperature for COVID-19 symptom detection, or determining whether a steak is properly cooked. Usually expressed in degrees C or F.
- Location: A GPS receiver receives time-coded signals from satellites orbiting the earth, and provides degrees of latitude (how far above or below the equator), degrees of longitude (how far East or West of the Prime Meridian), and elevation from the earth’s surface.
- Light: How much light is being received. These sensors often output lux, which is the measure of light that is striking a particular surface. Common applications include automobile auto-headlights, agricultural applications including when or when not to keep crops properly hydrated, and photography applications.
- Accelerometers: Used for detecting vibration or a change in acceleration. Common uses include modern smartphones for recognizing when you’ve rotated your phone, automotive applications including airbag triggering, and drones to help stabilize flight.
- Magnetometers: Measures the direction, strength, or relative change of a magnetic field. If you’d like to detect what compass heading your device is pointing at, a magnetometer can give you a 3-axis vector to the source. Applications include smartphones, automotive, and survey equipment.
- Gas Detection: Used for detecting the presence of various gasses like oxygen or carbon dioxide, as well as combustible, flammable, and explosive gasses. These could be used in applications like healthcare, mine safety, or automotive.
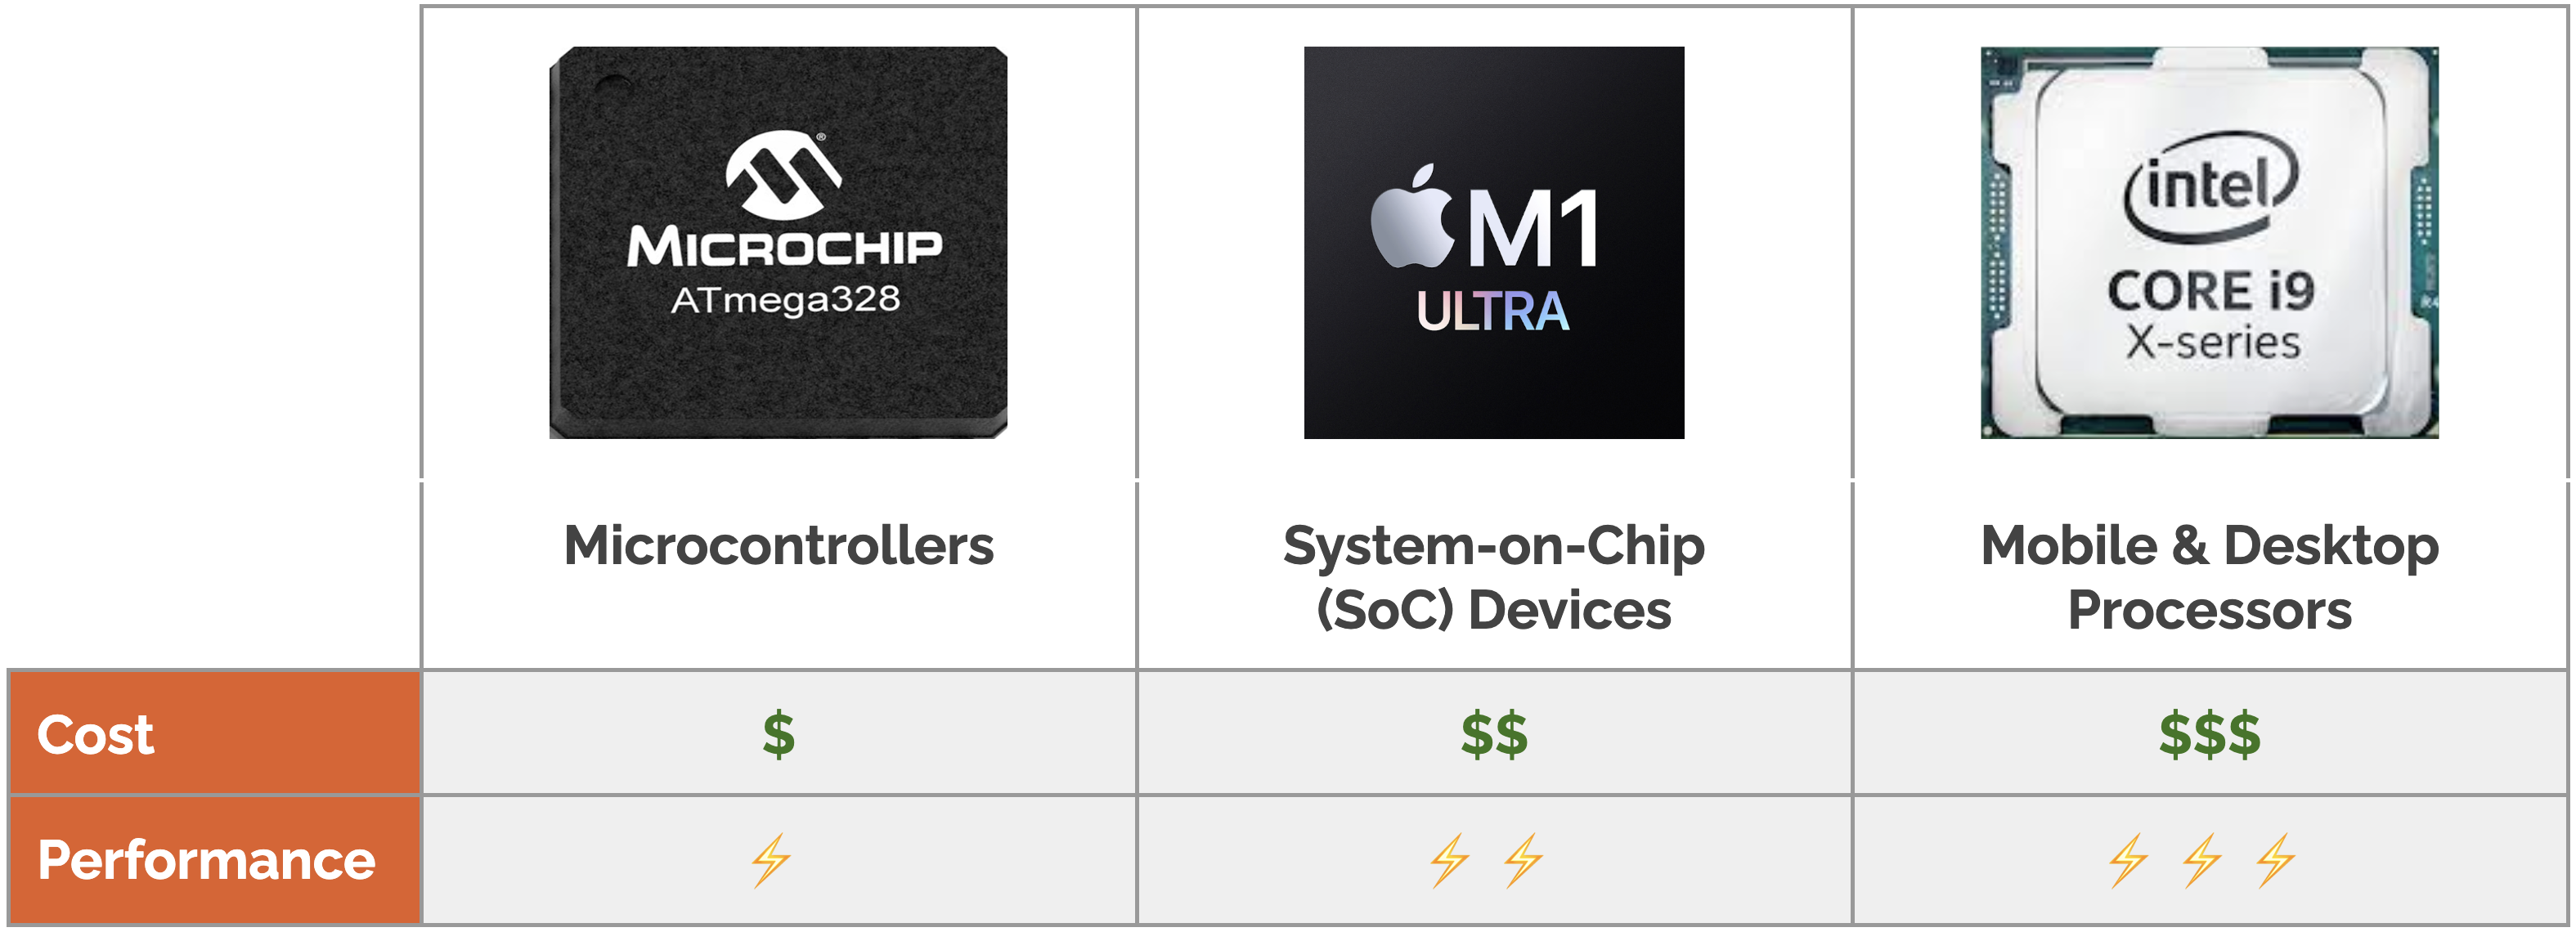
At the core of many types of standalone hardware is some type of processor, which can be broken down into a number of different classes:
- Mobile and Desktop Processors like Intel i9-series processors, or AMD’s Ryzen’s processors. While perfect for your desktop computer or laptop, these processors are way too power hungry, generate way too much heat, and require way too much support in terms of external motherboard circuitry to be useful for most embedded applications.
- System-on-Chip (SoC) Devices contain a processor and integrate many of the peripherals that were typically external. Peripherals include memory controllers, graphics cards (GPUs), WiFi and Cellular Modems, and various interfaces which allow for easy sensor interfacing. A SoC can be based on a microprocessor, for higher end applications like laptops. See Apple M1 Ultra. Or they can be based on microcontrollers, for lower end applications like internet connected toasters. There’s a wide range of prices and capabilities. Another example is the Broadcom BCM2711 used in the Raspberry Pi 4b.
- Microcontrollers: These devices are the least capable, but also the lowest cost, of any of the devices mentioned above. These are designed for fairly simple applications where you need a simple processor for a simple task. Examples include STM32, ATMega328, TI MSP430, or the ESP8266/32-series. Microcontrollers are used in automatically controlled products and devices, such as automobile engine control systems, implantable medical devices, remote controls, office machines, appliances, power tools, toys and other embedded systems1.

While blackbox testing methods can be used to simply test the user front-end of the device, Rivers Agile’s methods go beyond that to include whitebox testing, where we “lift up the hood” of the system, and understand some of the inner workings. This allows us to focus our testing efforts and provide actionable insights to developers on where the system broke down.
Many designers of embedded systems choose a linux-kernel based operating system because it’s relatively lightweight, uses less memory, allows for removal of unnecessary parts (for instance, a graphic desktop environment), and simply has a smaller footprint. Linux has become much more mainstream over the last few years, and adding command line linux skills to your QA repertoire will help add value to your resume. In this instance, we would highly recommend a user-friendly linux distribution called Ubuntu, which can be installed on standard off-the-shelf PCs, or within virtual machines.
Our example application
Now that we understand a high-level breakdown, let’s use an example where you have a small device that uses a Raspberry Pi Zero 2 W. The Zero-series are small 65mm x 30mm computers on a printed circuit board (PCB). The form factor makes them ideally suited for embedded devices where size and a thin profile is needed. While less powerful than normal Raspberry Pi’s, the Zero uses a lot less power which increases battery life for portable devices.
Our example embedded device runs a flavor of linux, has a digital camera attached to the camera port, has a temperature, humidity, and moisture sensor, attached LEDs, and a button.
The example application is a smart plant monitoring system. Plants need the right environmental conditions to prosper. It’s easy for someone to forget to water their plants, have them in direct sunlight which could overheat them, overwater them, and so on. The system includes a camera so that when someone is away from home, they can look in on their plants remotely. The LEDs include green/yellow/red indicators of current environment conditions, and a button to tell the system you’ve watered the plant.
Because the small device has fairly limited outputs, including no display, a different testing approach is required to ensure that each part of the system works as it should.
Getting access “under the hood”
While the Raspberry Pi supports keyboards, mice, and HDMI displays, there’s no reason to physically limit yourself to a separate desk or new working environment that takes up space, etc. Simply use your existing comfortable working environment and remote into the Raspberry Pi across the network. While traditional remote desktop (RDPing) access to Raspberry Pi linux installs is a thing, it’s usually overkill and unnecessary. Once determining the IP address of the Raspberry Pi, simply SSH into it. Secure Shell Protocol (SSH) provides command line access to the SUT (system under test), and allows you to interact directly with the sensors, LEDs, and cameras.
First, test the sensors.
The methods for attaching sensors to the Raspberry Pi can vary, and as a result, so does the way in which you query them. You’ll usually have access to, or should certainly request your development team to provide you with, a simple command line utility that reports results from each sensor.
You’ll want some way to verify the sensor results independently. There are off-the-shelf handheld units which will provide you with ballpark verification that what you’re seeing is correct, and accurate enough for your application.
Using the command line utility, read the current temperature. Use your handheld tool and see if they match. Heat up the environment using a heat lamp. Does the temperature increase accordingly? Cool the environment, for instance, place the device in a freezer. Does the temperature drop? You’ll want to test for the average nominal conditions, and then reasonable boundary limits on the upper and lower sides. Establish a baseline environment, take a measurement, stimulate low (temperature, humidity, moisture), take a new measurement, stimulate high, take another measurement.
The point that we’re establishing here is unlike a traditional web application testing where changing values in a field is enough to test the various input conditions – you’ll need to drive these sensors by modifying the environment in which they are located.
Perform these tests and record the results for each of the temperature, humidity, and moisture sensors.
Testing the button
In our plant monitoring solution, the button is used to notify the system when the last watering took place. It’s not too hard to imagine more buttons or even overload a single button for multiple functions with a double press, for example.
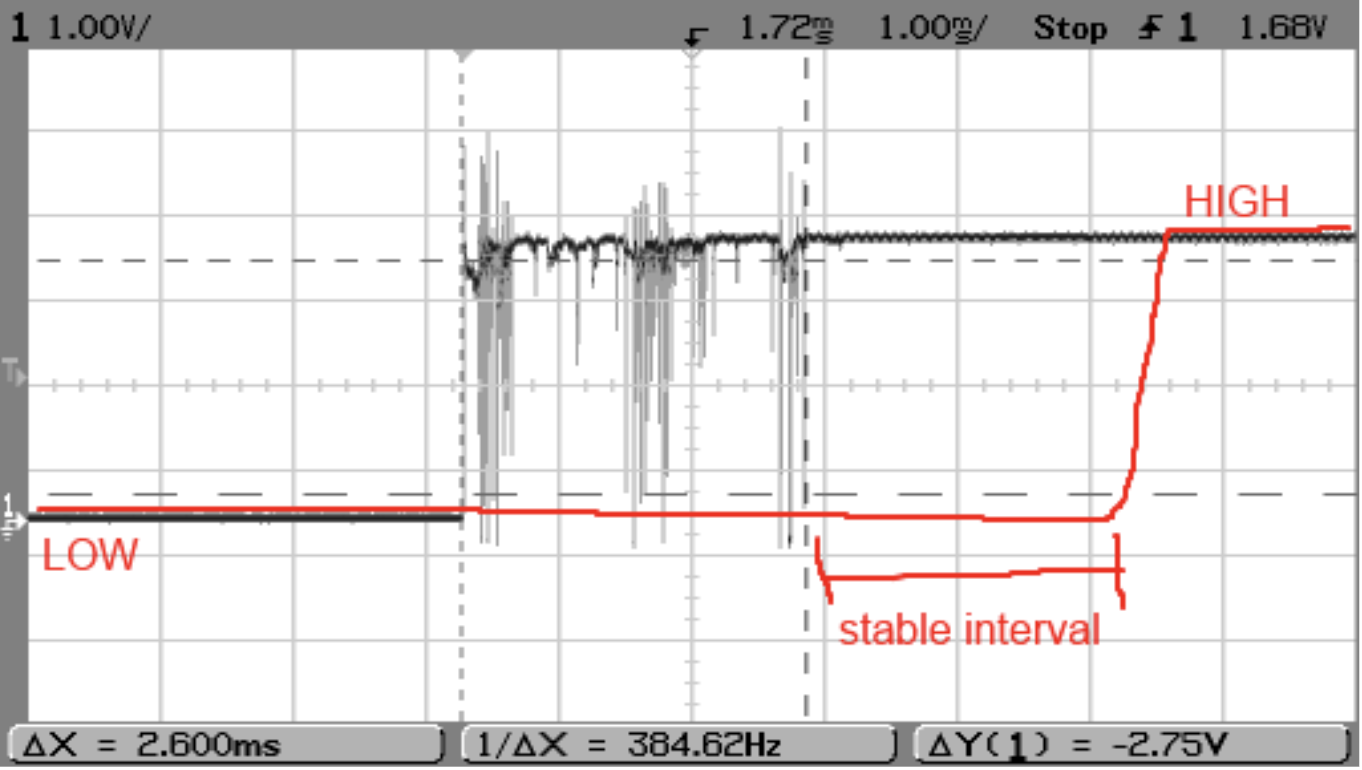
A momentary push button is a very simple action and one would think that there are exactly two possible states, either pushed or not pushed. But there’s a little bit more to it. It turns out that while a button is being pressed, due to the way the button is manufactured, that you get many different transitions between the two states until it stabilizes.
Below is a button attached to an oscilloscope that shows the various transitioning states from not pressed to pressed:

Source: https://github.com/thomasfredericks/Bounce2
You see all those transitions? You’ll really want to ensure that the development and engineering sides of the house have implemented proper button debouncing circuitry or software. This will ensure that actions are only taken once a stable interval is reached. Debouncing solutions can sometimes change the minimum amount of time the user must press the button, so you’ll want to test a quick press, a long press, a “normal” press. What happens if you press it twice in quick succession?
What you’re checking for here is that the button down event only fires once when you press the button, and that the button up event only fires once when you release it.
Testing the camera
Anyone who has studied digital photography will tell you – it’s all about the light. Knowing that, some questions we’ll seek to answer during this testing will include:
- Does the camera and lens system provide the right field of view? Too narrow? Too wide?
- How does the camera perform in low light conditions? Typically, image quality is inversely proportional to the amount of light as low light digital images often have a certain amount of noise.
- Is the auto-focus system used good enough to provide reliable sharp focus on the plant?
- Does the camera provide enough resolution for the user to see the small details of the plant?
- How does positioning of the embedded device affect the view of the camera? How does the user place the device to achieve the right results?
While we are testing the technical aspects of the hardware solution, we are also looking to protect the user experience and ensure a regular, non-technical user can achieve good results normally. Any special considerations should be called out in user documentation, quick start guides, etc.
The method for testing the camera is similar to other methods described: test the nominal average state, ensure that it works properly, and then see how the performance degrades as you approach the boundaries. Does the camera work in total darkness? Does the camera work in direct sunlight?
Beyond just testing some of the various connected hardware components, there’s a variety of different related tests that could also be performed:
- Business logic validation testing: Does the device solve the main use cases?
- Firmware testing
- FDA compliance testing for medical devices
- Drop, vibration, ruggedized testing
- Intrinsic safety testing for device use within dangerous gas environments
Wrapping up
There’s no doubt that this topic is vast – and to dive into specific details for every aspect in a single article is impossible. In future articles, we will explore testing bluetooth connectivity to mobile phones, HTTPS and MQTT connectivity to the cloud, and end-to-end system wide testing. Continue to follow our hardware testing blog series, but if you have questions about implementing quality assurance as part of your development life cycle, don’t hesitate to reach out as our team can offer solutions to help streamline your QA process – contact us today.


